
THE MULTI-RIG EXPLAINED (PART 3)
I left off in part two talking about some of the myths I see in print surrounding the Multi-Rig and the idea that bits need to be added to it to be certain it presents the hookbait correctly. The first and most common myth, which I touched on in part two, is that the hook loop needs to be held in place on the shank by adding extra components, which isn’t the case and I’ll explain why.
When I was testing the hook loop mechanics at Harefield Lake in 2000, (yes it’s that long ago!) I rigorously went through a casting out and reeling in process over and over again to check while using different hooks the loop hadn’t slipped or moved. I did that by following the line from my rod tip and wading out with the line in my fingers to where the lead had landed and was able to see my hookbait on the bottom. Every time the loop on the shank was in exactly the position I put it in before casting out and that has been the case ever since. The reason for this is quite simple, air resistance on the hookbait /s during the cast prevents the loop from slipping out of position and water resistance takes over when the lead enters the lake and pulls the rig down to the bottom. The whole time the hookbait is being forced in the opposite direction to the lead which straightens the hooklink and prevents the loop from sliding forwards or backwards. However, if when you reel in the hook gets caught up on some weed or some other obstruction then the loop will obviously be pulled down to the eye. If and when that happens’ you simply reset the loop to the desired position on the shank and recast.
It’s possible some anglers regularly in the media who have experienced this happening have assumed the loop has slipped and reacted by taking extra precautions and ended up using foam nuggets, silicon sleeve, hook beads, shrink tubing etc to hold the loop in place when it is completely unnecessary. It’s also possible those anglers have wanted to put their own stamp on the Multi-Rig and have added other components to suggest that by doing so they have improved the hooking potential of the rig and the efficiency of its mechanics. I’d like to agree because I’m all for continual improvement that actually makes a difference, but in this case I’m afraid it doesn’t. I’ve been using the Multi-Rig now for 16 years and never once had to add a single extra component to ensure the loop doesn’t slip before it lands on the bottom; because used correctly I know it doesn’t. The hookholds that I and other advocates achieve using my original specification confirm that.
One of the other misguiding claims I hear and have seen in print is the Multi-Rig is only suited for use with a pop-up, that’s completely wrong!
Just look back at Gary Kimbell and Nick Greenall’s results using both bottom baits and snowman baits in part one.
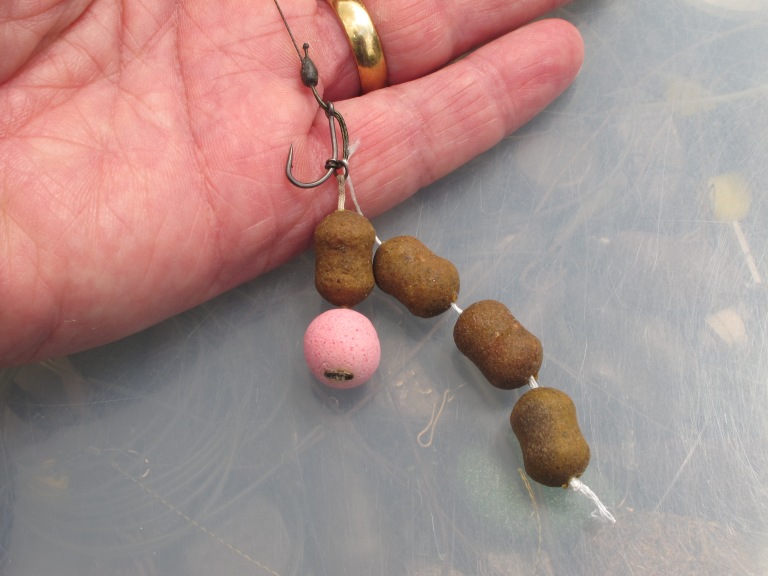
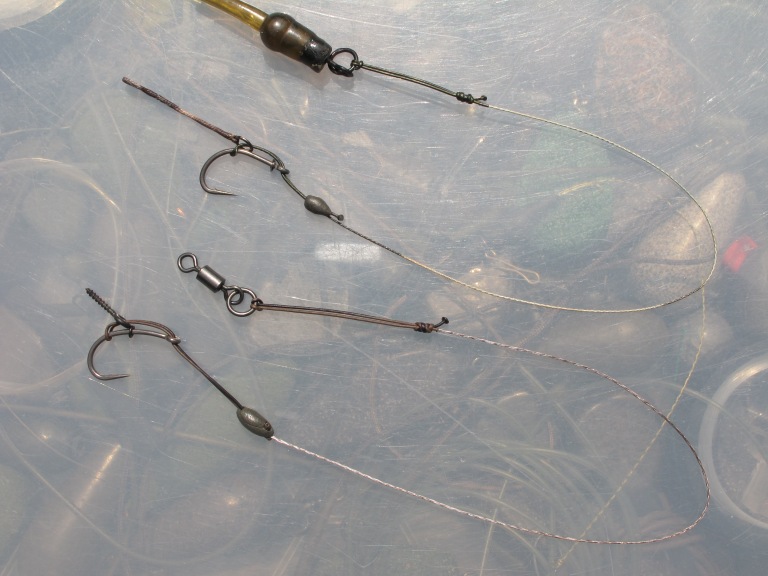
Another misunderstanding is the rig can’t be used with a PVA stringer because the string of baits pulling on the bend of the hook when you cast out and when they enter the water cause the loop to be dragged back to the eye of the hook. Well that will be the case if you tie the stringer to the bend of the hook, but with the Multi-Rig you don’t tie the string of baits to the bend of the hook, you tie it to the bottom of the loop. In doing so the string of baits are subjected to the same air and water resistance applied to the hookbait mentioned earlier. The same method can be used for meshed PVA bags that would normally be hooked on. If you look at the photograph you’ll see what I mean.
Some background to my use of loops
The first time I came up with the idea of using a knotted loop for my rigs was in 1983 when I started using sliding hooklinks and sliding Hair rigs. The next time I experimented with knotted loops and found a more significant use for them was in 1987 when I used them to hinge my hooklinks. That came about because I had a number of hooklinks snap on what would have been a very productive two day session had I not lost 10 carp out of 14hooked! It wasn’t all down to the hooklink snapping, I had a few hooks open and this was due to what turned out to be an uncompromising island snag that occupied a known hotspot. Those losses and my frustration found me as a last resort searching through my rucksack until I found some 45lb Black Spider Dacron to make a hooklink with. As you can probably imagine 45lb Dacron was thick, heavy and the absolute opposite of what at the time was believed to be essential if you were to fool a carp. The belief and advice given by leading anglers back then was that the hooklink had to be ultra supple and be able to allow the hookbait natural movement. After scratching my head for a few minutes pondering over how I could give the hookbait some natural movement using 45lb Dacron, I hit on the idea of hinging the hooklink by tying it the swivel via an overhand loop knot as opposed to tying it direct. I couldn’t believe the difference the hinge loop made to a short length (6”) of 45lb Dacron and the amount of flexibility and natural movement it allowed the hookbait. I was even more impressed when the last four carp of that horrendous session were hooked fair and square and landed. Once I realised the potential for using loops to hinge heavy hooklink materials I gradually introduced them into my fishing and come 1989/ 90 after a lot of experimentation, I matched hinged loops with black Amnesia and Stiff Links were born, the rest as they say is history. So me and loops go back a long way.
Multi-Rig Variations
As you might gather being a bit of a rig potential anorak, once I’d thought through, tested and established the concept of using a loop connection for the Multi-Rig with coated braid, I started to mix and match different hooklink materials and explored other ways of using it. Not long after using 15lb fluorocarbon I wrote about a Chod rig formed by making the hooklink one complete loop, which at first I thought had been ignored, but it obviously hadn’t because some time later I saw some versions that incorporated crimps to secure the loop appearing in print and being demonstrated at the Carpin-On shows. I pointed out at the time the convenient thing about making a complete loop with fluorocarbon and mono, particularly for a short Chod rig or combi-rig hook section; is it forms a natural curve that doesn’t need to be regularly reshaped. If you take a look at the photographs you’ll see what I mean.
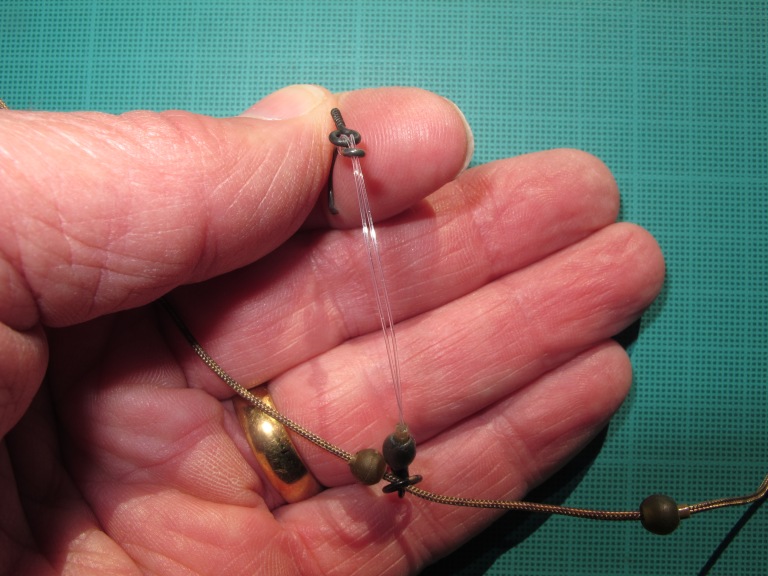
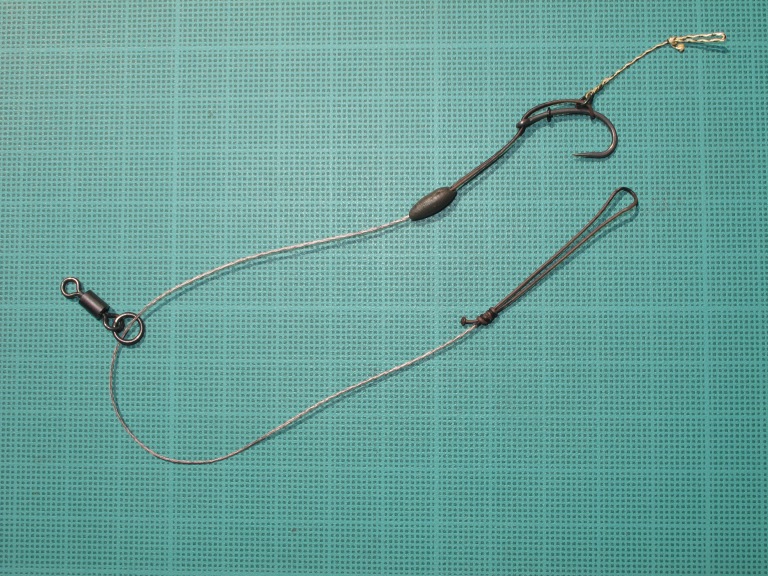
Another of my favourite ways to use the Multi-Rig with both bottom baits and pop-ups is with a stiff boom. To construct this version I use Rig Maroles 15lb CamH20 fluorocarbon which is incredibly strong and abrasion resistant and its low memory makes it the ideal boom material. I connect the coated braid hook section to the boom via the tried and trusted Albright knot, which given it streamlined round profile when finished is the ideal place to mould tungsten putty around.
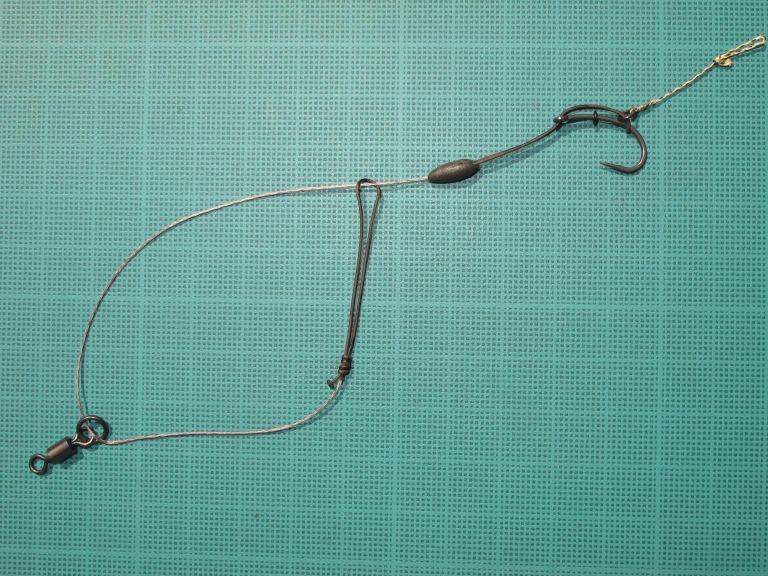
You can either make the braid hook section one complete loop and tie it to the boom double strand using the Albright knot, or form the loop like you normally would with an overhand / figure of eight knot and then tie it to the boom with the Albright knot as a single strand. Again if you look at the photographs you’ll see how I do it.

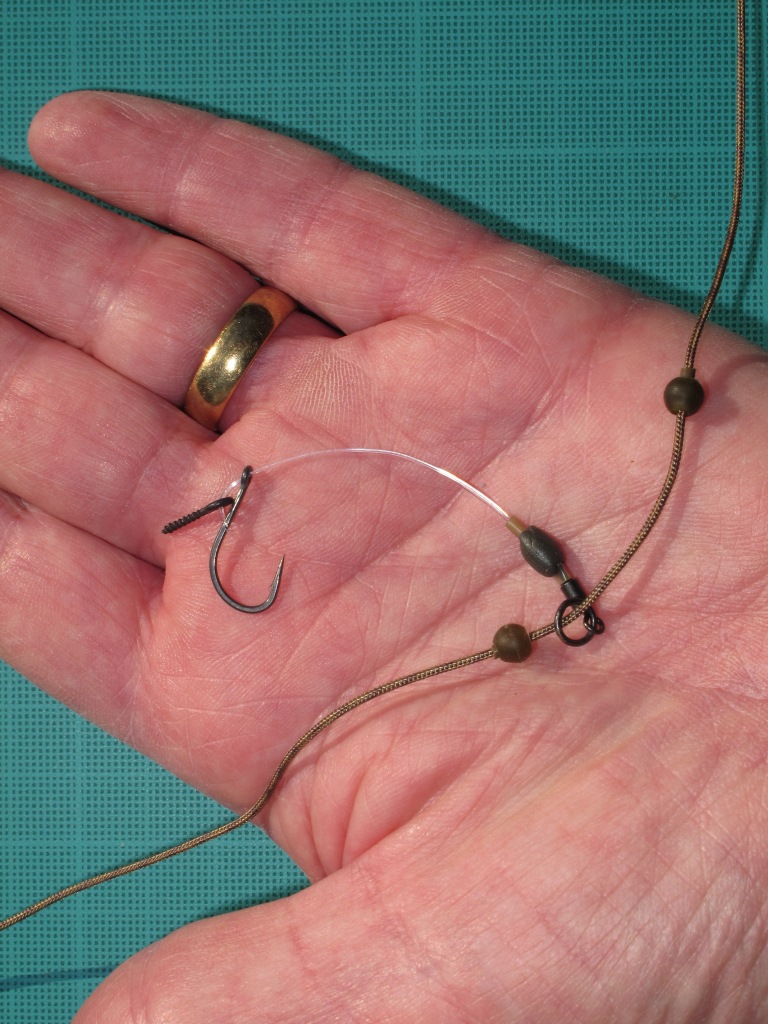
You’ll notice in the first photo I’ve peeled the coating for the complete loop version leaving enough on for the part of the loop that sits on the hook and extends just below the eye which acts as a kicker. In the second photo you can see the standard single strand version which only has the coating left on above the loop knot. It’s probably worth reiterating here the coating above the loop knot should always be left on. Being obviously more rigid than bare braid the coated loop ensures the hookbait travels along it in a controlled way no matter which type of component is used to mount the hookbait on including a sliding Hair. It also acts like an extension of the shank which can be any length you choose.
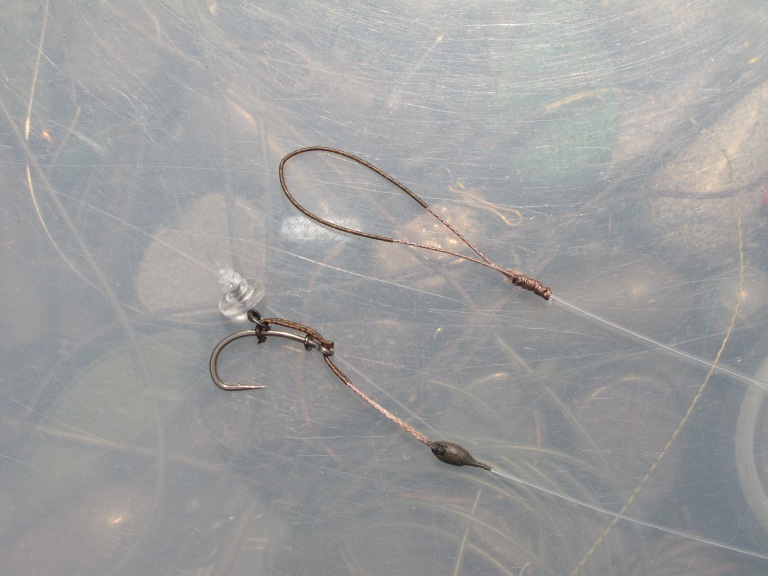
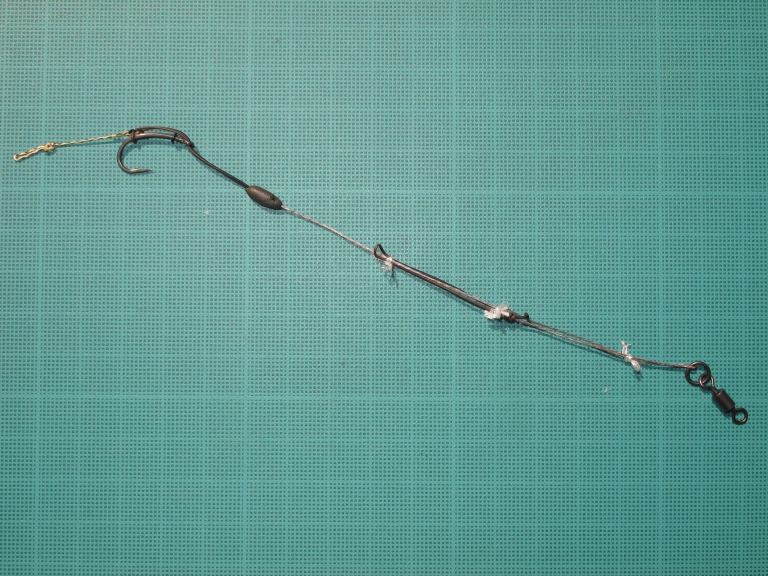
The next version I’m showing you does however allow for bare braid to play its part in the Multi-Rigs versatility, particularly if you are an angler that favours the suppleness non coated braid offers. The beauty of this version is the mechanics and enhanced hooking the loop connections guarantee is retained at each end of the hooklink, but everything in between is supple. As you can see in the next photograph you only need to strip the coating off the full length of the hooklink between the two loop knots to reveal the core braid for a very effective supple rig to be achieved.
I mentioned sliding hooklinks, these I’ve found are really effective in a number of situations. Some examples are, fished over the back of a gravel bar or in the margin of an island where carp tend to travel along browsing and occasionally stopping to graze on items of natural food that collects in those areas as well as anglers bait. The hookbait is picked up by the carp and as it moves on the hooklink extends underneath it until it tightens against the lead which takes the fish completely by surprise. This is evidenced by the fact that almost all the carp I’ve caught in the circumstances described are hooked dead centre in the bottom lip. I’ve used sliding hooklinks up to 24” long when fully extended, so roughly 12” long when doubled and cast out, but generally I use them about 12” long when extended with 4” sliding, so when casting out the hooklink is 8” long. The sliding section is held in place with evenly spaced pieces of PVA string and for the hooklink pictured I’ve used three, which is about average for the length of hooklink I use most. If you take a look at the next three photographs you’ll see how it’s done.
When the PVA string melts the hooklink can extend and once fully extended by a taking fish the sliding loop locks into the swivel eye until the fish is landed where upon the loop can be loosened and reset to slide again ready for the next fish. Other situations this rig scores well in is when used with a stringer, because the fish takes the stringer freebies and sucks in the sliding hookbait without detecting resistance and once again is taken by surprise when the hooklink tightens against the lead. Similarly the same element of surprise applies when the rig is cast into a heavily baited area where the carp are filled with confidence and moving from one freebie to another. However the stand out situation where sliding hooklinks have scored for me in the past is when I’ve fished on silt in a baited area with bottom baits. I put this down to the way carp feed in silt. I’ve seen them dig into the silt past their gill rakers to get at the natural larder it contains, especially bloodworm, and also albeit not to the same degree boilee free offerings that have found a place of their own in the silt or been washed over and covered when the silt has been disturbed by feeding carp. I think in this case the carp pushes its mouth into the top layer of silt to extract what it assumes is a free offering, and because once again it will not initially detect any resistance due the hooklinks ability to extend when pressured, the carp confidently moves on to the next free offering and gets done. Incidentally, I never use a critically balanced hookbait or pop-up on silt in a baited swim because it’s alien. I only ever use either of those if I’m presenting a single, because in that situation the carp has nothing to compare it with and is likely to take it out of curiosity or greed. You’ll notice I’ve left the coating on the sliding loop which as mentioned in part two also acts similar to a anti-tangle sleeve, but when using it as sliding loop it can be removed so it lock’s around the eye of the swivel more smoothly and with less of a jolt. Having said that the jolt with the coating left on is enough to set the hook, followed by full penetration when the lead takes over and you lean into the fish.
So there you have it. The knots I use for the various versions I’ve shown you are the Overhand knot, Figure of eight (loops). The Albright knot (braid to boom). The Palomar knot and 2 turn single tuck Blood knot direct to swivels, all of which have not let me down.
I hope you’ve found parts one, two and three useful in understanding the Multi-Rig concept, I can only apologise for the time it has taken me to get it written and uploaded.
Be lucky!
Mike.

Brilliant mike , love the simplicity of all your explanations of the multilingual, and what it can do along side all the other rigs described . I’ve screen shotted all this as it is the best I’ve seen described, mind you it was yours so it should be , thanks bri.
LikeLike
Thanks for your positive feedback Brian it’s much appreciated, I’m glad it was of help. I’ll be writing more about rigs in the future, the links will be on my Twitter account. Cheers, Mike.
LikeLike